
If you've ever winced at a surprise cloud storage bill after a big file transfer, you know the feeling. I certainly do. My moment of clarity came after sending a few terabytes of video footage to a client and seeing the invoice that followed. It felt like I was being penalized for using my own data. That’s when I decided to find a better way, one that didn’t involve paying steep fees to mainstream cloud providers.
Setting up your own S3-compatible server for file transfers might seem daunting, but believe me, the benefits in cost, control, and sheer speed are too good to ignore. This isn't just about saving money; it's about taking back control of your file-sharing workflow.
The Core Benefits of Self-Hosting
The biggest win is simple: you own your data, end-to-end. When your files live on your own hardware, you're in charge of who sees them and how they're handled. It's not just about privacy—it's about having complete authority over your digital assets. For anyone serious about data management, exploring options like the top small business backup solutions can offer a wider perspective on building a resilient data strategy.
Beyond just ownership, the practical advantages are huge:
- Slash Transfer Costs: Forget about those unpredictable egress fees that penalize you for sending files. Your only costs are your hardware and internet connection.
- Achieve Uncontrolled Speeds: Your transfer performance is dictated by your own network, not by shared public cloud infrastructure or arbitrary throttling.
- Enhance Security: You manage everything—from the access keys and encryption protocols to the physical location of your server. This creates a much tighter security loop.
The demand for better file transfer solutions is growing fast. In fact, global spending on cloud infrastructure is projected to hit $99 billion in Q2 2025 alone. That's a 25% jump year-over-year, driven almost entirely by data-intensive applications. You can see the full trend in this cloud infrastructure spending report.
Self-Hosted S3 vs Traditional Cloud Transfer Services
Here's a quick comparison I put together of the key differences between running your own S3-compatible server and using standard cloud storage providers for file transfers.
| Feature | Your Own S3 Server | Traditional Cloud Service |
|---|---|---|
| Data Ownership | 100% control on your hardware | Hosted on third-party servers |
| Transfer Costs | No egress fees; fixed hardware/bandwidth costs | Per-GB fees for data transfer (egress) |
| Speed & Performance | Limited only by your own network infrastructure | Can be throttled; shared resources |
| Security | Fully customizable security protocols | Standardized security; less control |
| Scalability | Limited by your hardware capacity | Virtually unlimited, but at a cost |
| Setup Complexity | Requires initial technical setup and maintenance | Instant setup; plug-and-play |
Ultimately, a self-hosted S3 server gives you unparalleled control and cost savings, while traditional services offer convenience at a premium.
A Simpler Path to Control
Now, you might be thinking, "This is great, but I'm not a systems administrator." I get it. The good news is that you don't have to choose between a complex DIY project and an expensive, restrictive service. There’s a much better middle ground.
The real magic happens when you pair your private S3 server with a user-friendly front-end. Your server becomes the secure, powerful engine, while an application provides the intuitive dashboard.
This is exactly why our team built HeftySend. It’s designed to connect to your own S3-compatible storage in just a few minutes. You get all the benefits—the cost savings, the data ownership, the unlimited capacity—without the headache of building and maintaining a custom web interface. It’s the perfect blend of professional control and modern convenience for your file transfers. We wanted to give people like you the best of both worlds, and I think you'll love it.
Choosing Your S3-Compatible Software with MinIO
When you decide to run your own S3 server, the great news is you don’t have to build it from scratch. You just need software that speaks the "S3 language," and after kicking the tires on a few options, my go-to recommendation is MinIO. It’s open-source, incredibly powerful, and has a massive community behind it, which is a lifesaver when you inevitably hit a snag.
I first stumbled upon MinIO a while back when I needed to create a private media archive. The goal was to store huge video files without the eye-watering price tag of a major cloud provider. What really sold me was its simplicity. I had a basic server up and running inside a Docker container in less than an hour. That's a huge win.
My experience is a perfect example of why self-hosted solutions are making a comeback. Amazon S3, which launched way back in 2006, really set the standard for object storage. Its influence is massive—as of 2025, Amazon S3 still holds around 24% of the enterprise cloud storage market. With global data expected to balloon to 200 zettabytes by 2025, with half of that living in the cloud, the need for flexible, efficient file transfer solutions is only growing.
Why MinIO Stands Out
MinIO isn't the only game in town, but it has a killer combination of features that make it perfect for anyone looking to set up their own S3 server for file transfers. This is less about a checklist of specs and more about how it feels to use it day-to-day.
- It's Fast. MinIO is built for high-throughput. In my own tests, I was consistently maxing out my network bandwidth when moving large video files around. That's exactly what you want.
- It's Simple. The setup, especially with Docker, is refreshingly straightforward. You don't need a PhD in system administration to get a secure server online.
- It Scales. You can start small, running it on a single drive, and scale all the way up to a multi-petabyte cluster without having to re-architect everything. This is ideal for projects that start as a side-hustle but have big ambitions.
What I really appreciate about MinIO is its laser focus. It does one thing—S3-compatible object storage—and it does it exceptionally well. There's no feature bloat or complicated licensing to wade through.
Hardware You Actually Need
Don't let the thought of hardware intimidate you; you probably have everything you need already. You don't need a rack of enterprise-grade servers to get started. My first MinIO instance ran on an old desktop computer with a couple of big hard drives I had lying around.
Here are a few realistic starting points:
- A spare desktop or server: Anything with a decent processor and at least 8GB of RAM will work beautifully for most use cases.
- A Network Attached Storage (NAS) device: Many modern NAS boxes from brands like Synology or QNAP can run Docker containers, making them perfect MinIO hosts.
- A cloud virtual machine: If you don't have spare physical hardware, you can spin up a small VM from any cloud provider for just a few bucks a month.
While MinIO is a fantastic self-hosted option, many people also use commercial S3-compatible services. You'll often see providers like DigitalOcean Spaces used for hosting digital assets like images and videos.

Ultimately, picking your software is the first big step. But remember, the server is just the engine. To turn it into a truly powerful tool, you'll need a clean front-end to manage uploads and shares. This is where a user-friendly service for file sharing with S3 integration, like our app HeftySend, comes in to transform your raw storage into a polished, professional solution.
In the next section, we’ll get our hands dirty and walk through the process of installing and configuring MinIO.
A Practical Guide to Setting Up MinIO
Alright, let's roll up our sleeves and get your own S3-compatible server running with MinIO. Setting it up is surprisingly straightforward, especially if you're comfortable with a little command-line work.
I'm a big fan of using Docker for this. It keeps everything clean, containerized, and ridiculously easy to manage. No messy installations to worry about later.
My goal here is to give you a practical, follow-along guide. We'll skip the overly dense technical manuals and just focus on getting a secure, functional server online. This is the exact process I follow, and it's served me well for countless projects.
Preparing Your Server Environment
Before we touch any installation commands, let's get the server prepped. The beauty of MinIO is its flexibility—you don't need a supercomputer. A simple cloud VM, a dedicated server, or even a beefy Raspberry Pi can get the job done.
The first thing I always do is create two specific directories. One will hold the MinIO configuration files, and the other will store the actual data—all your buckets and the files within them. This separation is key for organization and makes backups a thousand times easier down the road.
I recommend creating a main folder, let's call it minio, and then two subfolders inside it: config and data. Trust me, this simple step prevents major headaches later.
Installing MinIO with Docker
With our folders ready, we can pull the MinIO image and spin up our container. Docker is fantastic because it bundles all the software and its dependencies into a single, isolated package. This means the setup is consistent and repeatable, no matter what OS your server is running.
You'll need a few key pieces in your Docker command:
- Ports: You need to expose two ports. One is for the S3 API (traditionally port 9000), which is how your applications will talk to the server. The other is for the MinIO web console (I use port 9001), which gives you a great GUI to manage everything.
- Volumes: This is where we link our
configanddatafolders on the server to the inside of the Docker container. This is crucial—it ensures that even if you stop or restart the container, all your settings and files are safe and sound on your server's disk. - Access Keys: You'll set your root username and password right in the command. Think of these as the master keys to your entire storage system. Choose something very strong and secure.
Once you run the command, Docker will download the latest MinIO image and boot it up. In just a few moments, you'll have a fully functional S3-compatible object storage server running. It’s a pretty amazing feeling the first time you see it come online.
The real power of using Docker here is speed and isolation. If you mess something up or want to start fresh, you can just nuke the container and start over in seconds without touching the rest of your server.
Initial Configuration and First Bucket
Now for the fun part. Open a web browser and go to your server's IP address followed by the console port you chose (e.g., http://your-server-ip:9001). You'll land on the MinIO login screen. Use the root credentials you defined in the Docker command to log in.
The interface is clean, modern, and built for performance.
The first thing to do is create a bucket. A bucket is basically a top-level folder where you'll store your files. Think of it as the main container for a specific project or client.
Just click the "Create Bucket" button, give it a unique name (bucket names have to be DNS-compliant—all lowercase, no underscores), and you're good to go.
With your first bucket created, you're officially running your own private cloud storage. You can start dragging and dropping files directly through the web UI to test things out.
Setting Up Secure Access Keys
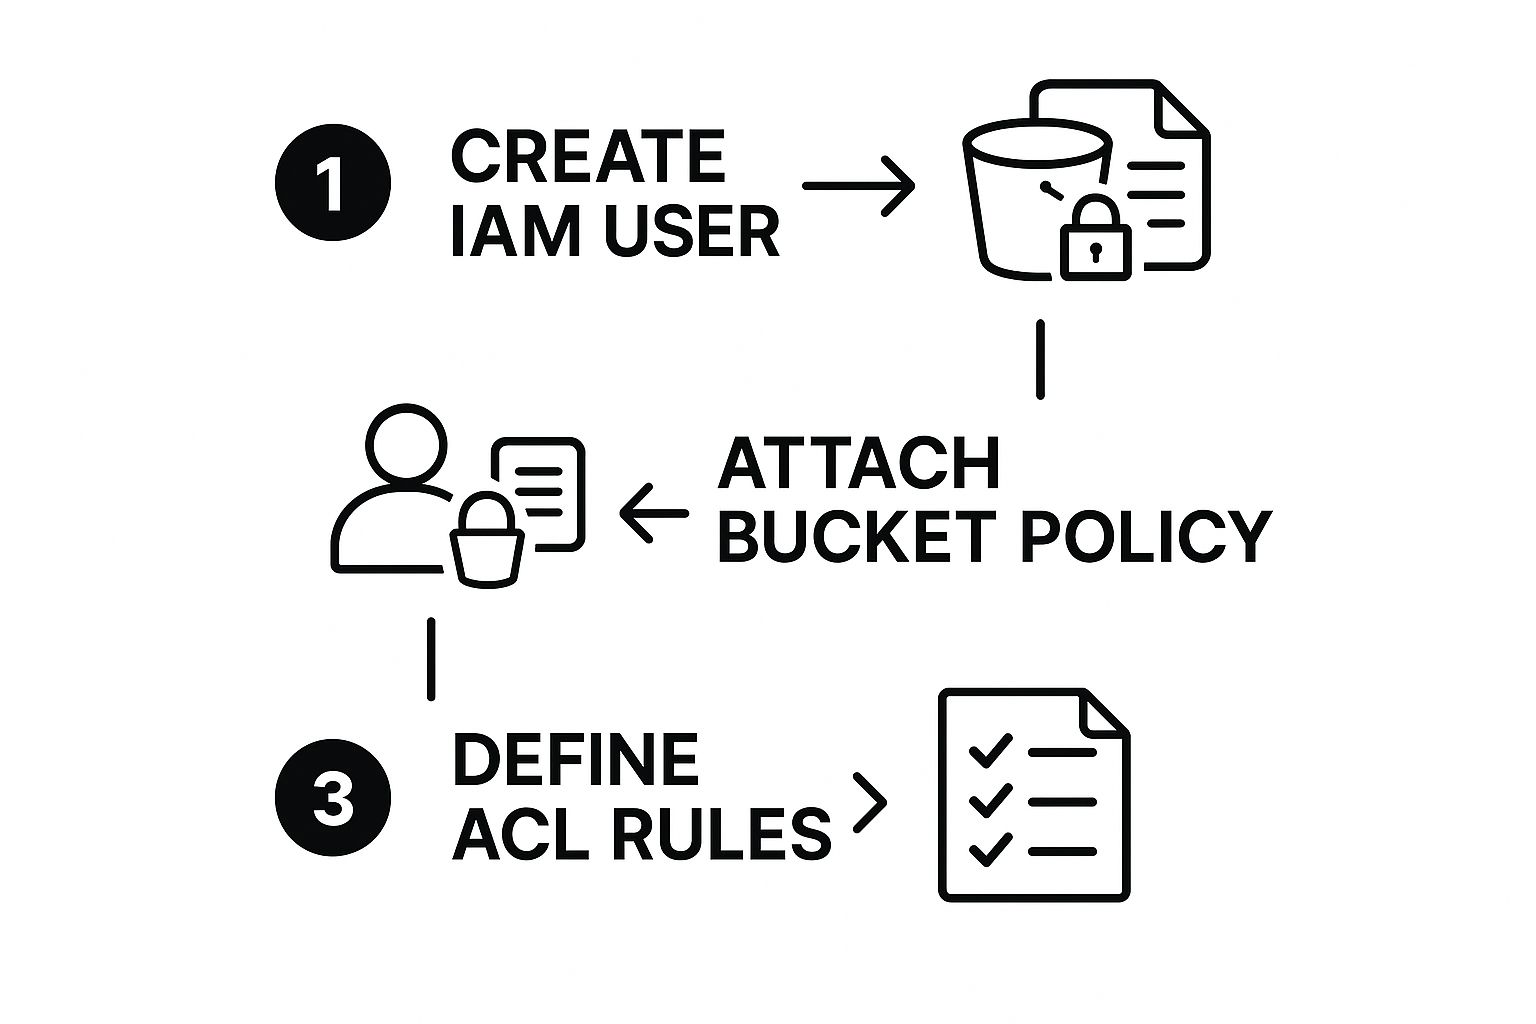
Using your root credentials for everything is tempting, but it's a huge security risk. The correct way to do this is to create dedicated access keys with limited permissions for each application or user that needs to connect to your server.
This is my standard workflow for locking things down:
- Create a User: Head over to the "Identity" section in the MinIO console and create a new user.
- Generate Access Keys: For this new user, generate a new set of keys. You'll get an
Access Key(like a username) and aSecret Key(like a password). Save these immediately in a password manager, because you will never see the secret key again. - Assign a Policy: Now, attach a policy to this user that grants them specific, limited permissions. For example, create a policy that only allows them to read and write files within that one bucket you just created, and absolutely nothing else.
This "principle of least privilege" is non-negotiable for security. If an application's keys ever get compromised, the damage is contained to only what that specific user was allowed to do. It’s a simple step that drastically improves your setup and gives you a robust, secure foundation to transfer files with your own S3 server.
Connecting Your S3 Server to HeftySend
So, you've got your own powerful, private S3 server up and running. That's a fantastic start, but let's be real—on its own, it’s just a raw storage endpoint. It's like having a race car engine sitting on a pallet in your garage. You can't really do anything with it until you put it in a car.
To actually transfer files with your own S3 server in a way that feels seamless for you and looks professional to your clients, you need a user-friendly front end. This is where we connect the dots and make the magic happen.
This is the exact workflow we designed HeftySend for, and it's a total game-changer. We're going to bridge the gap between your powerful backend storage and a clean, intuitive interface by hooking your MinIO server up to HeftySend.
Unleashing Your Server's True Potential
A raw S3 server just doesn't have the features needed for professional file sharing. There's no simple upload interface, no easy way to generate shareable links, and definitely no download tracking. HeftySend provides that missing layer, transforming your private storage into a polished, full-fledged file transfer service.
The connection process itself is refreshingly simple. You just need three key pieces of information from your MinIO setup:
- Your Endpoint URL: The public web address of your S3 server.
- Your Access Key: The unique identifier for the user you created.
- Your Secret Key: The password that goes with that access key.
You’ll plug these details into your HeftySend account (custom S3 storage is available on the Premium, Ultra and Lifetime plans), and that's literally it. From that point on, every file you upload through HeftySend's slick interface is stored directly on your server. This means you keep 100% control and ownership over your data while getting a best-in-class user experience.
The main takeaway here is simple: With HeftySend, you get a beautiful, easy-to-use interface for uploading files and generating secure links, but all the data lives on your own server. This is how you unlock your S3 server's true potential.
The demand for cloud services that enable these kinds of workflows is massive and still growing. AWS, for instance, is a dominant force, expected to control roughly 30% of the global cloud infrastructure market in 2025. This leadership is built on the power and flexibility of services like S3. With a 357% surge in customer counts since 2020, it’s clear that businesses everywhere are relying on S3-compatible infrastructure for critical file transfers. For a deeper dive into these trends, check out the latest AWS market report.
A Look at the HeftySend Interface
Here’s a quick peek at the clean, drag-and-drop interface you’ll be working with once your server is all hooked up.

As you can see, the entire focus is on simplicity and speed. It completely removes the technical headache of dealing with a raw S3 bucket for everyday tasks.
This integration lets you forget about the command line or clunky web consoles for day-to-day file sharing. You can upload gigabytes of data, set link expiration dates, and even brand your download pages without ever having to log into your MinIO server directly.
This is the power we wanted to put in your hands. It’s the perfect blend of robust, self-hosted power and effortless, client-facing polish. By connecting your server to HeftySend, you get all the benefits of owning your storage without any of the daily management headaches.
Managing and Securing Your S3 Server

Getting your S3 server online is a fantastic feeling, but the real work starts now. Keeping that server running smoothly, securely, and efficiently is what separates a weekend project from a reliable, professional-grade solution. This is especially true when you need to transfer files with your own S3 server.
Over the years, I've learned a few hard-won lessons about managing private storage. It’s not just about flipping a switch; it's about building a resilient system you can actually trust with your most important data.
Let's dive into the practical steps that will keep your server humming along and your files safe.
Building a Bulletproof Backup Strategy
Hardware fails. It’s not a matter of if, but when. I learned this the hard way years ago with a drive failure that almost cost me a major project. A solid backup strategy isn't optional—it's the foundation of responsible server management.
Your approach doesn't need to be complex, but it must be consistent. Here’s a simple, effective plan I've come to rely on:
- Regular Snapshots: Automate nightly or weekly snapshots of your MinIO data directory. This can be as simple as a cron job that copies the data to a secondary drive.
- Offsite Copies: A local backup is great, but what if there's a fire or theft? Regularly sync your backups to another physical location or even a cheap cloud storage service designed for archives. This provides critical disaster recovery.
- Test Your Restores: This is the step everyone skips. A backup is useless if you can't restore from it. Once a quarter, actually try to restore a file or a small bucket from your backup to ensure everything is working as expected.
Monitoring Your Server Health
You can't fix problems you don't know exist. Proactive monitoring is crucial for spotting issues like dwindling disk space or unusual network activity before they become critical failures. You don't need a massive, enterprise-level dashboard to get started, either.
Simple monitoring tools can alert you to key metrics like CPU usage, memory consumption, and disk I/O. For a deeper dive, the folks at Opsmoon have a great article on Infrastructure Monitoring Best Practices.
Think of monitoring as a health checkup for your server. It gives you the insights needed to keep performance high and prevent unexpected downtime, ensuring your file transfers are always available when you need them.
Of course, managing all this yourself requires time and expertise. This is where a hybrid approach shines. By using a service like HeftySend that connects to your S3 server, you offload the management of the user-facing application while retaining full control over your storage. It’s a great way to find the right balance between convenience and control.
Automating with Lifecycle Policies
As you use your server, it will inevitably accumulate old, unused files. Manually cleaning these out is a tedious chore that's easy to forget. This is where lifecycle policies come in—they are automated rules that manage your files for you.
For example, you can set a policy to automatically:
- Delete old log files after 30 days.
- Move project files to a long-term archive bucket six months after they were last accessed.
- Expire temporary uploads after 24 hours.
Setting up these policies in MinIO is straightforward and saves you countless hours of manual cleanup. It keeps your storage organized and prevents your disks from filling up with data you no longer need, which is essential for maintaining a high-performance system when you need to transfer files with your own S3 server.
Common Questions About Self-Hosted S3 Transfers
Diving into self-hosted storage for the first time? I get it. It can bring up a lot of questions. I know it did for me when I first started tinkering with this stuff. To help clear things up, here are some of the most common questions I hear, along with answers pulled from my own experience.
https://www.youtube.com/embed/3SaWt3DwzwM
Is Setting Up My Own S3 Server Difficult?
Honestly, it can look pretty intimidating from the outside. But modern tools have made it surprisingly simple to get off the ground.
With software like MinIO and the magic of Docker, you can follow a guide like this one and have a basic server up and running in less than an hour. The real challenge comes later when you start digging into advanced configurations, like setting up a reverse proxy or getting deep into security policies. But for the initial setup? It’s totally achievable for anyone with some basic command-line comfort.
How Much Does Running My Own S3 Server Cost?
This is a big one, and the short answer is: it depends. The great news is that the software itself, like MinIO, is completely free and open-source. No licensing fees to worry about.
Your real costs come down to hardware and internet bandwidth. You could spin up a server on an old desktop you have lying around, a dedicated machine, or a cloud VM. For a lot of folks, especially those who need to transfer files with their own S3 server often, this route is dramatically cheaper than paying the sky-high per-gigabyte egress fees from the major cloud providers. If you’re moving a lot of data, the savings add up fast.
Why Use HeftySend If I Have My Own S3 Server?
This question really gets to the heart of the workflow. An S3 server is just the backend—think of it as the engine. It's fantastic for storing data, but it completely lacks a user-friendly way to actually send those files to clients or coworkers. You can't just hand someone a command-line string and expect them to figure it out.
That's where HeftySend comes in. It provides that critical front-end experience. You get a simple drag-and-drop interface, link management, password protection, and download tracking, all powered by your own S3 server. It transforms your private storage into a polished, professional file transfer service.
Can I Use Other S3-Compatible Services Too?
Absolutely. While this guide focuses on MinIO (it’s my personal favorite for self-hosting), we built HeftySend to play nicely with any S3-compatible storage provider.
This flexibility means you can easily connect to popular services like:
The connection process is nearly identical across the board. As long as you have your endpoint URL, bucket name, access key, and secret key, you can hook it into HeftySend and get all the same benefits. The system is designed to give you the freedom to choose whatever storage backend makes the most sense for you.
Ready to unlock the full potential of your S3 storage? HeftySend gives you the professional, user-friendly interface you need to turn your private server into a powerful file transfer solution. Sign up and connect your S3-compatible storage in minutes. https://heftysend.com